I suddenly had the idea to make a beach bag and just started crocheting! Even though I had no clear idea as to what the end product would look like, I knew EXACTLY how I wanted to decorate it! Great big floppy Hibiscus Blooms - like the ones you find on the Island Queen Hibiscus:
The bloom is quite frilly and just altogether fantastic. Not an easy thing to recreate!
Remember a few weeks back I helped Designer Iin Wibisono test the FRILLY PANSY pattern (I used it to decorate my JAR JACKETS)? The big frilly pansy petals were perfect to start forming my Hibiscus Bloom - so thank you Iin for the inspiration and letting me borrow something from your idea!
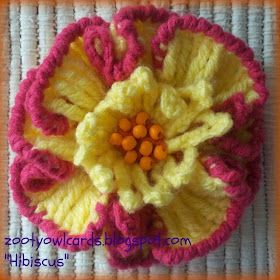
I used the reverse single crochet to edge the first one I made:
I love the look of the reverse single crochet, but my fingers get a bit knotted up doing the crab stitch, so I changed the edging a bit on my second attempt:
Quite happy with how it turned out - of course not even close to as spectacular as Mother Nature's work - but not a bad yarny copy!
Special thanks also to the ladies who tested the pattern for me! You girls ROCK!
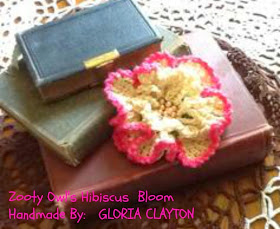
Gloria Clayton used a cotton poly blend for the petals and base but had to switch to Simply Soft to get the hot pink border. Gloria says "I found it pleasing to make and believe with your special stitch instruction it could be made by some beginners." She suggests that you DO read the whole pattern through before starting to crochet as there are several portions to be worked.
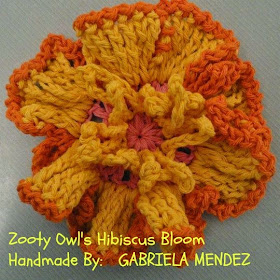
Gabriela Mendez from Beunos Aires used cerise for rows 1 and 2 - the same colour as the beads; then a soft yellow for the petals and the flower centre; bright orange for the eding. Gabriela says "it is wonderfully written, very clear"
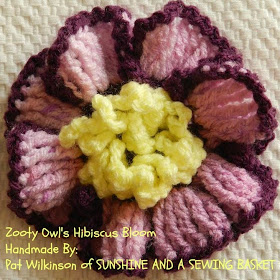
My wonderful bloggy friend, Pat Wilkinson, from SUNSHINE AND A SEWING BASKET once again stepped up to help me test, making her Hibiscus in these beautiful shades.
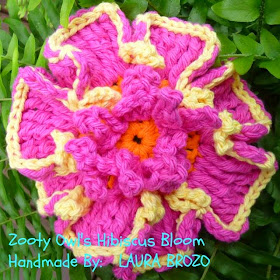
I can also always count on my Facebook friend, Laura Brozo to quickly and effectively test my patterns! I just LOVE the hot pink she used as well as the straight slip stitch along the edge!
Thank you all, once again, for your wonderful input!
So enough blah blah blah from me....... here is the pattern!
HIBISCUS BLOOM
PATTERN TERMS: US
My patterns are all written in US terms - I have included this little chart to make it easier for my UK readers to reference the difference in stitch terms.
Skill Level: Intermediate
Approximate Time: 60 minutes
Yarn: Any DK (8 ply / Light Worsted Weight) or Aran (10ply / Worsted Weight) Yarn (I used Lollipop DK) - The bloom is made from 3 different colours.
Hook: Use whatever hook size suits your choice of yarn and your tension (I used a 5.00 mm hook; and a 4.00mm hook)
Special Stitches: I use a double triple crochet (dtrc) (yarn three times around hook) - this is known as a Triple Treble in UK Terms (ttr)
Foundation: With colour A and using a 5.00mm hook - 4ch, sl st to join OR make a magic ring
Row 1: 3ch (counts as 1 dc), 11 dc into circle (12 dc), sl st into top of 3ch to join
Row 2: 3ch (counts as 1dc), 1dc into top of same dc; (2dc into top of next dc) x11 = 24dc; sl st into top of 3ch to join
Row 3: Join colour B into top of any dc; 4ch, 2dtrc into same dc as join; 3dtrc into each of next 2dc; into next dc 2dtrc, 4ch sl st; (4ch, 2dtrc into same dc as sl st from previous petal; 3dtrc into each of next 2dc; into next dc 2dtrc, 4ch sl st) x 6; 4ch, 2dtrc into same dc as sl st from previous petal; 3dtrc into each of next 2dc; into next dc (same dc as start of first petal) 2dtrc, 4ch sl st= 8 petals formed
Petal Edging: Using the 4.00mm hook join Colour C with a sl st into the top of first dtrc on any petal; (1ch; 1sl st into the top of next dtrc) x 9; (1ch, sl st into 4ch) x 3; sl st into sl st at base of 4ch; 6ch, sl st into 3rd ch from hook (picot formed) 3ch, sl st into sl st at base of 4ch
[(1ch, sl st into 4ch) x 3; (1ch, sl st into top of next dtrc) x 10; (1ch, sl st into 4ch) x 3; sl st into sl st at base of 4ch; 6ch, sl st into 3rd ch from hook (picot formed) 3ch, sl st into sl st at base of 4ch] x 7; break off yarn
(VARIATION: you could use the reverse single crochet - as with the Frilly Pansy - to edge your petals!)
Flower Centre: Using the 4.00mm hook attach Colour B with a slip stitch around any dc post in Row 1; 9ch, sl st into 3rd ch from hook (picot formed) 6ch;
(sl st around next dc post in Row 1; 9ch, sl st into 3rd ch from hook; 6ch) x 11; sl st around last dc post from Row 1; break off yarn

Embellishment - sew a few little beads into the centre of the flower!
This little flower is quite versatile!
Leave the picot part out when you do the edging, don't crochet the flower centre - and add a big button to the centre instead:
PS: OOOh...... ooh and a last test in - this one from Iin Wibisono - isn't it pretty??? (Thank you Iin)





Your flower is just beautiful. I'm definitely going to make it next. Thanks so much for sharing your talent with the rest of us. :)
ReplyDeleteLove them....all of them!!! Thanks so much for sharing the pattern, can't wait to make some of these beautiful hibiscus flowers.
ReplyDeleteLovely floppy flouncy blooms!!! All of them look splendid ... a very versatile pattern my friend xxx Pat
ReplyDeleteLovely flowers from all the testers!
ReplyDeleteLove it love it! thanks for the great pattern :)
ReplyDeleteThank you for the pattern.
ReplyDeleteJust the thing I need to Brighten up a summer outfit! Thanks a lot for sharing the pattern.
ReplyDeleteAbsoluty beautifull !! I love it ! thank you a lot for the pattern !
ReplyDeleteYou continually amaze me! This is so gorgeous and really captures the frilly, blousy style of the real thing! Chrissie x
ReplyDeleteBeautiful design!
ReplyDeleteThese are lovely, thanks for sharing.
ReplyDeletethank you for this pattern! I was not looking for anything in particular when I started checking out your blog but this is one of many things that caught my eye. I just made a hat for an 18 inch doll and this will look beautiful attached to it. Of course I will use thread instead of yarn. BTW, you have a new fan today! I plan to check your blog out very often.
ReplyDelete