
I am delighted that so many lovely people have joined our little Crochet-a-long and are sharing their fabulous creations! It's is not too late to join in! Patterns will remain on my Blog so that you can work at your own pace and make as many blankets as you like!
I have provided explanations and links for the special stitches, but other than that, Ramsgate is a fairly straightforward square.

This week we will be making the "Ramsgate" Square:

RAMSGATE SQUARE PATTERN:
Make 1 x Ramsgate Square for the Baby Blanket
Make 2 x Ramsgate Square for the Lapghan
Some of the squares in this CAL may need blocking. For good measure I am blocking all my squares, even the ones that are perfectly flat and square. With "cold" blocking your squares won't spoil. I have been spraying cold water onto the squares one by one as I place them onto the blocking station. I don't think that drenching them is a good idea and I would also never use hot water.
Yarn requirements, hook size, blanket sizes and layouts, previous patterns and other useful CAL information are contained in the following posts:
INTRODUCTION
YOU MIGHT LIKE TO KNOW and
IN LOVE WITH COLOUR
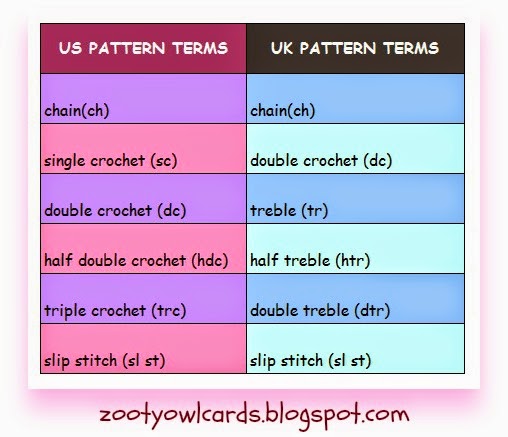
PATTERN TERMS: US
SPECIAL STITCHES:
2dc cluster (2dc tog) = 2dc cluster is formed as follows - yarn over hook, work the first part of the stitch leaving 2 loops on your hook (do not complete the stitch), repeat this once more (three loops on hook). Yarn over hook and draw through the loops on the hook to form your cluster.
4dc cluster (4dc tog) = 4dc cluster is formed as follows - yarn over hook, work the first part of the stitch leaving 2 loops on your hook (do not complete the stitch), repeat this 3x more (five loops on hook) Yarn over hook and draw through the loops on the hook to form your cluster.
Picot = (A picot is a loop of thread created for functional or ornamental purposes along the edge of lace, ribbon, crocheted, knitted or tatted material. These loops vary in size, according to their intended function and to their creator's artistic intention. The word picot is pronounced [pē' kō]. It is a diminutive derived from the French verb piquer, meaning 'to prick'.) A picot is formed by crocheting 3ch and then sl st into the 3rd ch from hook (the first of the three ch in other words)
Ssc = Standing Single Crochet
BPdc = Back Post Double Crochet (see Scottburgh Square for explanation)
************
Foundation: 4ch, ss to form ring or make a magic ring.Round 1: 3 ch (counts as 1dc), 11dc into ring; sl st into 3rd of start ch to close (12dc). Break off yarn.
Round 2:: Join yarn in top of any dc, 2ch 1dc (counts as 2dc cluster) 1ch; (2dc cluster into top of next dc, 1ch) x11 (12 x 2dc clusters). Sl st into top of 1st cluster to close. Break off yarn.
Round 3: Join yarn in any 1ch sp, 3ch (counts as 1dc), picot, 1dc into same 1ch sp, 1ch; (1dc, picot, 1dc into next 1ch sp, 1ch) x11. Sl st into 3rd of start ch to close. Break off yarn
Round 4: Join yarn in any 1ch sp; 2ch, 3dc tog (counts as 4dc cluster), 4ch; (4dc cluster into next 1ch sp, 4ch) x11. Sl st into top of first cluster to close. (12 x 4dc cluster, 4ch). Break off yarn.
Round 5: Join yarn in any 4ch sp; 2ch (counts as 1hdc), 5hdc into same sp; 6hdc into next 4ch sp; (3dc, 3ch, 3dc into next 4ch sp); [(6hdc into next 4ch sp) x2; (3dc, 3ch, 3dc into next 4ch sp)] x3. Sl st into 2nd of start ch to close. Break off yarn.
Round 6: Join yarn in any 3ch (corner) sp; 2ch, 3dc tog (counts as 4dc cluster), 3ch, 4dc cluster into same sp; [BPdc around each of next 18sts; (4dc cluster, 3ch, 4dc cluster into 3ch sp)] x3; BPdc around each of next 18sts; sl st into top of start cluster to close. Break off yarn.
Round 7: Join yarn with a Ssc in any 3ch sp; 4sc into same 3ch sp; skip 4dc cluster; 1sc into each of next 18 sts; skip 4dc cluster; (5sc into 3ch sp, skip 4dc cluster, 1sc into each of next 18 sts, skip 4dc cluster) x3. Sl st into top of Ssc to close. Break off yarn.
Round 8: Join yarn in 1st of corner 5sc; 3ch (counts as 1dc), 1dc into next sc; (1dc, 3ch, 1dc into next sc), 1dc into next 2sc; 1dc into each of next 18sc; [1dc into each of next 2sc; (1dc, 3ch, 1dc into next sc); 1dc into each of next 18sts] x3. Sl st into 3rd of start ch to close. Break off yarn.
Crochet BORDER ROWS 1 AND 2 around square.
****************
A special thank you once again to Ritha Vishwanath of HOOKS, NEEDLES AND MORE for the time and effort put into testing the Ramsgate Square.
PS: The official CAL has ended but you can still join in at your leisure. The links to all the patterns for the CAL can be found in the pinned post of our Seaside Winter Blanket Group


